

Nothing says Autumn like caramel apples! Sticky sweet on the outside and crispy tartness on the inside - they were meant for Halloween. Now, you can go to the store and purchase pre-made caramel apples in all varieties from $3 all the way up to $20+. However, homemade caramel apples are fresher, crisper and a whole lot tastier. And getting the whole family in on the experience makes for a wonderful activity for kids as well as adults! Below you will find all you need to know to create your own homemade caramel apples which will make you the hit of the party and the envy of all your friends!
.Choose Your Apples.

Making a caramel apple is about pairing the sweetness of caramel with the right apple. Of course, if you don't like tart apples, then pick a sweeter one - you have plenty of choices! Apples to stay clear of are Red Delicious- which lacks the firmness required for caramel apples, and Rome Beauty- which is primarily used in baking. Recommended apples include:
o Braeburn: Golden-green to red skin, firm, sweetly tart
o Fuji: Yellow-green skin, firm, sweet
o Golden Delicious: golden skin, firm, sweet
o Granny Smith: green skin, very firm, tart
o Jonathan: Yellow-red skin, firm, sweetly tart
o Jonagold: A hybrid of Jonathan and Golden Delicious, firm skin, tangily sweet
o Lady: Red to yellow skin, firm, sweetly tart
o McIntosh: Reddish-green skin, firm, sweetly tart
1. Choose smaller apples - they'll be easier to make, easier to eat, and will give you a better caramel to apple ratio!
2. Store-bought apples are usually coated with wax, which makes it more difficult to coat them. If possible, buy apples at a farmer's market. Or you can go apple picking and get your own fresh off the tree!
3. If you have no choice but to use wax-coated apples, quickly dip them in boiling water and then wipe away the wax coating.
4. Chill the apples in the refrigerator until you're ready to start cooking.
.Gather Your Equipment.
There are two ways to make homemade caramel: from scratch (which is time-intensive, but delicious), or from melted caramel candies. Either way you'll still get the fun of coating apples and adding additional tasty toppings.
.General Supplies.
Even if you're not making from scratch caramel, you'll still want to have these things on hand before you start cooking:
1. Wooden skewers or popsicle sticks, buy them at your local grocery or party supply store, cut bamboo skewers in half or gather small sticks from your yard and clean them really good.
2. Pot for making or melting caramel
3. Tray or baking sheet (for completed apples), Aluminum foil: you'll need this if you do not want to put your finished apples directly on an oiled baking sheet, tray, or serving platter. Alternatively, you can top your baking sheet with a silpat mat or wax paper.
4. Wooden spoon
5. Extra bowls, if adding additional toppings
6. Another pot or bowl for melting chocolate, if adding it to apples
.Caramel Making Equipment.
If you've decided to make your own caramel, you'll also need the following tools:
1. Second container, bigger than your cooking pot, You'll fill this pot with hot water to create a bain-marie (a hot water bath, which keeps the contents of the submerged container warm) for your cooking pot when making your own caramel. If your second container cannot be used to boil water, you'll need a teakettle or another pot in which to boil water.
2. Measuring cups and spoons
3. Candy thermometer, a candy thermometer is very important, especially if you're making caramel for the first time. You'll need it to make sure your heated sugar reaches the right stage of completion. Make sure your thermometer's accurate: being off by just a few degrees can mean the difference between delicious and burnt. To check its accuracy, clip on your candy thermometer and set a pot of water to boil. The thermometer should read 212 degrees Fahrenheit/100 degrees Celsius when the water is boiling. If not, note what temperature it reads at and adjust for the difference.
4. Pastry brush, to keep sugar from crystallizing as you work.
.Prepare Your Workspace.
Before you start working with the caramel, make sure you have everything ready and near at hand. If you don't have everything ready to go before hand, you risk burning your caramel.
1. Get Your Apples Ready. Check for firmness and bruising before using. Remove the stems from good apples. Wash and dry your apples. Insert the wooden skewers sticks or popsicle sticks.
2. Butter your baking sheet or tray (or aluminum foil) so it's ready to hold coated apples.
3. Set out dishes with any additional toppings you plan to put on the apples after they're caramel-coated. Possible toppings include:
Sprinkles
Toffee bits
Edible glitter
Licorice
Candy Pumpkins
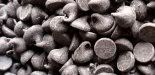
Chocolate Chips
White Chocolate Chips
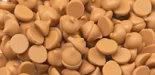
Peanut Butter Chips
Butterscotch Chips
Chopped Peanuts
Chopped, Whole of Half Walnuts
Chopped, Whole of Half Pecans
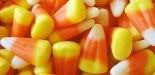
Candy Corn (use the red ones for fangs!)
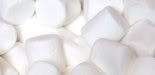
Marshmallows
M&M's and Mini M&M's
Reese's Pieces
Jelly beans
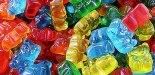
Gummi Bears, Worms, etc.
Granola
Trail Mix
Kosher salt
Mini Marshmallows
Pretzel Pieces
Crushed cookies, such as Oreos or graham crackers
Dried fruit, such as apricots, cranberries, cherries, pineapple or raisins
Chopped or crushed candy bars like Kit Kats, Reese's Cups, Snickers, Butterfinger, or Baby Ruth
Pieces of Cereal (Individual Cheerios, Apple Jacks, etc.)
Melted Chocolate or White Chocolate (dipped or drizzled)
Melted Butterscotch or Peanut Butter Chips (drizzled or dipped)
Shredded Coconut (mix with food coloring to make colored coconut)
Melted White Chocolate with Food Colouring (for faces, decorating, etc.)
Plastic Halloween Decorations (Spiders, Eyeballs, etc.)


.Make Your Caramel.
.Melting Caramel Candies.
14 oz of caramel candies makes approx 6 caramel apples.
.Ingredients.
14oz bag of caramel candies
2 tbsp. milk, water or cream
additional flavoring (optional)
.Instructions.
1. Unwrap the candies from a 14oz bag.
2. Melt them, over a low heat, while stirring in two tablespoons of milk, water, or cream.
3. When the caramels have melted into a smooth liquid, they're ready to use.
(Please skip below to learn how to coat your apples.)
.Microwave Version.
1. Unwrap caramels and place them with the water, milk or cream in a large microwaveable bowl.
2. Microwave on High until caramels are melted, stirring every minute.
3. Remove caramel mixture from microwave.
.Caramel from Scratch.
Makes enough caramel to coat 6-8 apples.
.Ingredients.
1 & 1/2 C Brown Sugar
1 & 1/2 tbsp. Butter
6 tbsp. Milk, Cream or Water
1/2 tsp. Vanilla extract
.Instructions.
1. Set your pastry brush in a cup of warm water.
2. Add the ingredients listed above, except the vanilla extract, to a saucepan.
3. Cook over medium-high heat.
4. While the candy cooks, boil water in the second pot or teakettle for your bain marie. If using a teakettle, fill your second container when the water is boiling.
5. Stir the caramel until the mixture reaches 236 degrees Fahrenheit, brushing the pot's sides with a wet pastry brush as necessary (to prevent crystals from forming).
6. When it's at the right temperature, place the pot with the caramel in the waiting bain marie. Take the bain marie away from any heat source at this point, if you haven't already.
7. Stir in vanilla.
.Coat Your Apples.

1. Work quickly, before the caramel cools and solidifies. If caramel gets too solid to work with, whip in a tablespoon of cream over low heat until it's workable once more.
2. Dip the apples in the liquid caramel. Tilt the pot and spoon caramel over the apples as necessary for full coating. 3. Let excess drip back into pan. Scrape caramel off the bottom of the apple with a knife, or use the edge of the bowl. 4. If using additional toppings, dip each apple in them right after it's been coated.
5. Place apples on the waiting tray or sheet.
6. When all your apples are coated, place them in the refrigerator to cool.
.More Ideas for your Caramel Apples.
Here are a smattering of ideas to give your caramel apples and extra boost of creativity.
.Flavored Caramel.
Flavor your caramel for an interesting twist on your caramel apple.
1. Vanilla extract goes perfectly with caramel; double your vanilla for more vanilla taste.
2. Add maple extract for a fall-like flavor. 3. Add peanut butter. 4. If you're melting caramel candies, melt chocolate caramels instead of regular ones.
5. Add mint or peppermint extract for a minty flavor.
6. Banana flavoring
7. Orange Liqueur
.Caramel Apple Variations.
Re-create favorite flavor combinations:
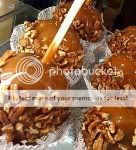
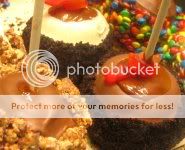
1. Turtle Caramel Apples: Add pecans and chocolate on top
2. Rocky Road Caramel Apples: Marshmallows, chocolate, and pecans
3. Peanut Butter Crunch Apples: Peanut butter cookies and chocolate drizzles
4. S'Mores Apples: Marshmallows, chocolate, and graham crackers
5. Seattle Caramel Apples: Trail mix and chocolate chips
6. Cherry Almond Caramel Apples: Almonds, cherries, and chocolate
7. Sweet and Salty Caramel Apples: Chocolate and sea salt
.Chocolate Caramel Apples.
You can always dip your apples in a second layer of milk or dark chocolate. If you're not a fan of chocolate, use white chocolate for your coating instead. There are so many ways to do this, you can first add your candy or nut toppings and then spoon or drizzle on the chocolate or you can do the second coat of chocolate and then add your candies or nuts. Its all up to you, make them your own!
You'll want to use the highest quality chocolate you can afford. 12 ounces will cover approximately six mid-size apples.
1. As your caramel apples cool (on their buttered baking sheet or aluminum foil), melt chocolate. Your apples should cool in the refrigerator for at least 30 minutes. You can melt chocolate in a saucepan over low heat, or by putting chocolate in a microwave-safe container and microwaving. As long as you pay attention to the chocolate, and stir regularly, there's no need for a double boiler.
2. When your chocolate's melted, remove the pan from heat (or take the bowl out of the microwave!).
3. Insert your caramel apples, tilting and dipping as necessary to completely cover the apple.
4. If you desire, add toppings to the apple before the chocolate solidifies.
5. When all your apples are coated, place the apples back in the refrigerator to set. Apples made with tempered chocolate can be kept at room temperature without discoloring.
.Even More Caramel Apple Ideas.
Instead of coating whole apples, create a caramel dip and provide guests with apple wedges, as in this recipe.
Martha Stewart's website has a recipe for creating spun sugar caramel apples, it creates web-like strands around your apple. Recipe Here. Be cautious when working with spun sugar, it is extremely hot!
.Inspiration Gallery.
Be fair warned, these photos will make your tummy growl and your teeth hurt!


.Helpful Tips.
If you've never made caramel apples before, or have had a recipe or two come out disastrous (it definitely happens), don't despair. When you get it right, making caramel apples is easy as could be. If you want to know how to make caramel apples perfect every time you make them, follow these tips:
o If this is your first time, use packaged caramels-- it's easier to get the texture right. Especially if you don't have much experience candy making.
o Be sure your apples are washed and VERY dry before dipping.
o Choose smaller apples to make caramel go further-- after all, it's hard to finish a whole one, anyway.
o Use cold apples for dipping to keep the caramel from sliding off. Chill the apples in the refrigerator until you're ready to start cooking.
o If in doubt, decorate your apples. If they're coated in nuts, chocolate, etc., they won't stick together and can be packaged individually.
o If using store-bought apples, the wax applied to them may keep the caramel from sticking. Scrub apples clean with baking soda, or dip briefly in boiling water to remove the wax.
o When decorating with larger items, don't make them too big, as big items tend to be too heavy for the caramel to hold them.
o Make sure to eat them within three days of making them.
o If you're giving the apples as gifts, you can place them in plastic or cellophane bags (once they've cooled) and tie off with ribbons.
o Coat the apples with caramel by spooning the hot caramel over the apples. It will flow smoothly around the apple to make a thin, uniform layer.
o Roll the freshly coated apples in the candy quickly so that the candy will stick fast.
(Sources: Divine Dinner Party, MarthaStewart.com, flickr, Mahalo.com, eHow.com and a yahoo.com image search. )
Now go make some caramel apples!!


No comments:
Post a Comment